

QuickBooks is a great choice for small and even mid-sized businesses, but as companies reach enterprise level, they're looking for something more in an accounting package. Transitioning from one accounting system to another requires a commitment of extra time and energy to get the new program running smoothly. There's also a learning curve involved in mastering any complex new software. But when your company is ready to make the leap from QuickBooks to an enterprise-level system, the benefits you'll get from its more robust feature set will more than make up for the hassle of switching systems.
Moving all your precious financial data to a new platform is an unnerving and potentially hazardous experience. If it's corrupted or deleted, you could lose your entire corporate financial history. Before you pull the trigger on your new software, it's important to know how to safely get your data out of QuickBooks and into the new system. Fortunately, most enterprise-level systems make this transfer fairly simple. Some even provide apps and other tools to manage it for you. After all, it's in their interest to make adoption easy. And if you choose wisely, your new enterprise-level software could be the last one your company ever buys.
How to know when you've outgrown QuickBooks
As your company grows, you’ll eventually reach a point when QuickBooks is no longer the best choice for your bookkeeping needs. Signs that it’s time to consider a more robust accounting platform include:
- The employees who regularly use QuickBooks have developed “workarounds” to help them do things QuickBooks isn’t really designed for.
- QuickBooks now runs really slowly due to the sheer mass of data you’ve put into it.
- You have significant inventory to manage (QuickBooks’s inventory management isn’t up to handling significant quantities or rapid turnover).
- You use a number of other software packages to handle functions that QuickBooks can’t do.
- Your month-end closing process takes forever and requires a huge number of repetitive tasks.
- You’re approaching the 30-user limit that QuickBooks imposes.
If one or more of the above factors apply to you, it's time to consider upgrading to an enterprise-level program.
Moving to an enterprise accounting program
Before you choose your enterprise-level accounting program, be sure to review the options closely. You don't want to go through the process of moving only to get stuck with a program that doesn’t provide the features you need or won’t scale with your company.
Once you’ve settled on the best option for your company, here are the next steps to get your data safely from QuickBooks to the enterprise-level accounting program of your choice.
QuickBooks to NetSuite
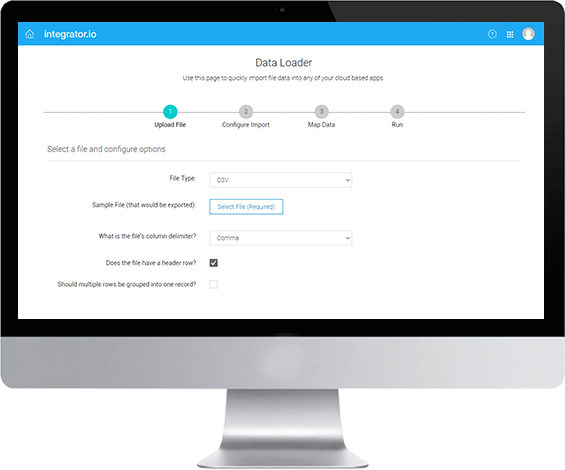
Celigo offers a free Data Loader tool that you can use to automate the data migration process from QuickBooks to NetSuite.
The process is as follows:
- Export your QuickBooks data as an XLSX file.
- Log into integrator.io and select the Data Loader option.
- The Data Loader wizard will walk you through the process to select your QuickBooks export file, designate NetSuite as your destination program, and map your fields.
- After the import runs, the integrator.io will display a status, including any errors that popped up during the import. You’ll definitely want to take a close look at said errors to see what went wrong and what you’ll need to do to fix it.
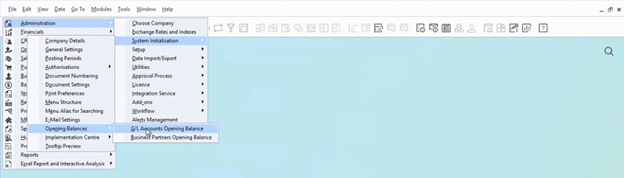
QuickBooks to SAP
Your SAP reseller will likely offer to manage the import process for you. However, if you choose not to take them up on this offer, the process is as follows:
- Export your QuickBooks “master data” as an XLSX file. This includes the chart of accounts, customers, vendors, items, and item prices.
- Import the master data into a SAP import template. This step makes it easier to ensure that your data is mapped correctly and that any duplicates or errors are removed before they get into your new accounting program.
- Import the master data template into your SAP account.
- Export your QuickBooks opening balances as an XLSX file. This would include your GL, AP and AR, purchase orders, and ending balances to date.
- Import the opening balances into a SAP import template, review, and scrub the data as in the previous step, then import the template into SAP.
- You have the option of importing transactional data from QuickBooks, using the same process as the master data and opening balances imports. Alternatively, you can skip importing transactional data and simply leave your QuickBooks account live for purposes of historical querying.
QuickBooks to Intacct
Intacct has a QuickBooks Migration Wizard that makes moving your data fairly simple. Here’s how the process works:
- Log into Intacct and select the QuickBooks Migration option under the Company tab.

- Install the Data Access tool, which will enable Intacct to pull data directly from your QuickBooks platform.
- Open your company file in QuickBooks, then select Upload Data in the Intacct migration wizard. QuickBooks will prompt you to either allow or deny access; select Yes and click Continue to give Intacct access to the data.
- You can preview the data in Excel spreadsheet format and do any necessary scrubbing before it's transferred to Intacct.
- Intacct will commence the migration process by importing your lists, including customers, vendors, and the like, and will email you when it’s complete. The program will do its best to map your QuickBooks accounts, but it will likely need some help. You can manually select which Intacct account number to use for each QuickBooks account.
- Once your chart of accounts and other master data is imported, you can then import your QuickBooks transactions. Again, Intacct will run this process in the background and email you when it’s complete. You’ll need to check the transactions post migration to confirm that they were correctly imported and mapped.
QuickBooks to Sage
Before you can run the Sage import process, you’ll need to set your QuickBooks account to allow access. Go to Edit > Preferences > Integrated Applications and make sure that “Don’t allow any application to access this company” is not selected. After that, the process is as follows:
- Go to the File menu in Sage and select Convert a Company.
- Choose QuickBooks in the conversion window and click Okay.
- Select your QuickBooks company name and choose which items you want to convert (most likely you’ll want to choose everything). Make sure that QuickBooks and your company file are both open before you move to the next step.
- QuickBooks will prompt you to either allow or deny access; select Yes and click Continue to give Sage access to the data.
- Review your QuickBooks account numbers; these will be converted to account IDs within Sage.
- Select your accounting method and set the start of your fiscal year, the point at which you will begin entering data, and the point at which you will begin entering payroll transactions.
- Look through the conversion summary and if everything looks correct, proceed with the process.
- Review your newly imported data within Sage and clean up any errors.
QuickBooks to Microsoft Dynamics GP
Microsoft has a Data Migration extension for both QuickBooks Online and QuickBooks Desktop. Here’s how it works:
- Before you start the migration process, decide how you’ll want to map your accounts within Microsoft Dynamics GP.
- Within Business Central, select the lightbulb icon, type 'assisted setup,' then click the link. Choose Migrate Business Data.
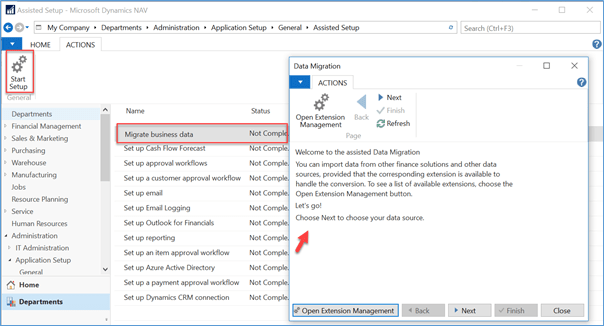
- The migration wizard will walk you through the steps to import your lists and transactions from either version of QuickBooks.
- Review your newly imported data to make any necessary adjustments. Transactions will be imported as unposted, so you’ll need to change them to posted once you’ve verified each transaction.
QuickBooks to QuickBooks Desktop Enterprise
Upgrading from a different version of QuickBooks Desktop to QuickBooks Desktop Enterprise is usually a simple process. Switching from QuickBooks Online is a bit more complicated. Here’s how it works:
- Install and launch the QuickBooks Desktop Enterprise software.
- If you are converting from another version of QuickBooks Desktop:
- Open the existing company file within QuickBooks Desktop Enterprise and click the “I understand that my company file will be updated to this new version of QuickBooks” checkbox, then click the Update Now button.
- Follow the prompts to create a data backup (just in case your company file is corrupted during the update process), then proceed with the update.
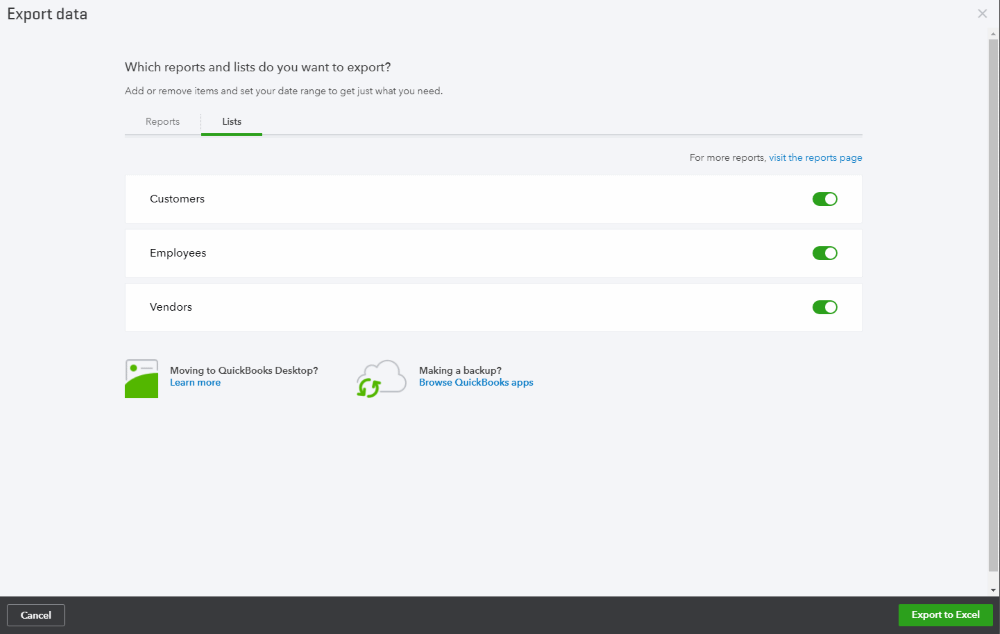
- If you are converting from QuickBooks Online:
- You’ll need to be running QuickBooks Online in Internet Explorer 10 or higher for the conversion to work. Add *.intuit.com to Internet Explorer’s list of trusted sites before launching the conversion process (you’ll find instructions on how to add it as a trusted site here).
- Right-click on the QuickBooks Desktop Enterprise shortcut and select Run as administrator.
- Open the QuickBooks Online company and click the gear icon at the top of the screen, then select Tools > Export Data. Choose the Moving to QuickBooks Desktop option and follow the prompts to proceed with the export. The export process will take anywhere from minutes to hours, and you will receive an email once it’s complete.
- Switch to QuickBooks Desktop Enterprise and use it to open your newly created company file.


